Posted on

MYOB Online Course Videos — Restoring a Backed Up File

Restoring a backed up file is easy! Just go to File, then click Restore in the dropdown box. MYOB will prompt you to back up the company file you are in; just click No.

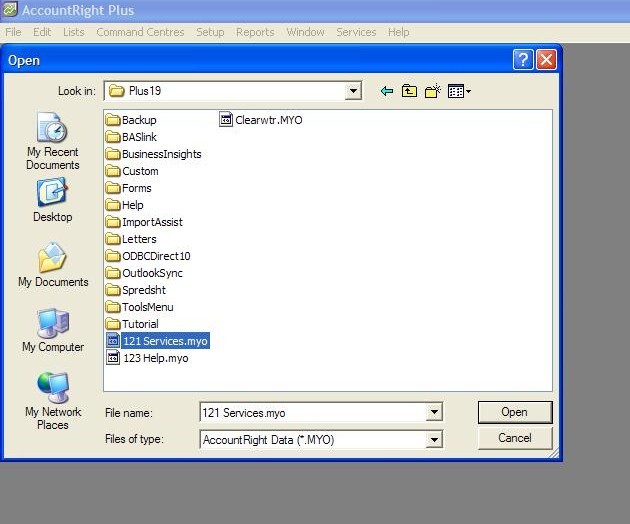
Select the file you want to restore. Insert the disc or USB (whichever way you backed up your file), select File, then Open.

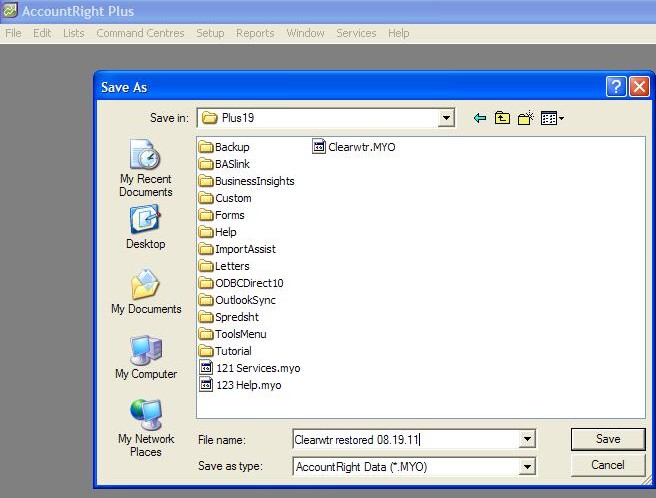
MYOB will then ask where you want to save the file. Select ‘C’ drive, then MYOB Plus 19 folder.

So that you know this is a restored file, save it as company name (followed by ‘restored’) and then today’s date and save.

MYOB will then advise the name and place where you have requested the restored file to be saved to.

MYOB will then extract the restored backup.

***

Video Reference: 501504

Link for existing students: http://ezylearnonline.com.au/training/mod/resource/view.php?id=381

Receive EzyLearn news, new training materials and updates as they occur by subscribing to the blog: www.ezylearn.com.au/wordpress

For information about our Online MYOB Training Course and new Lifetime Membership for all students, please visit: http://ezylearnonline.com.au/courses/myob-training/

Please feel free to send your comments about this video to: sales@ezylearn.com.au


Posted on

MYOB Online Course Videos — Introduction to Customising Forms in MYOB

MYOB gives you the opportunity to customise various forms.

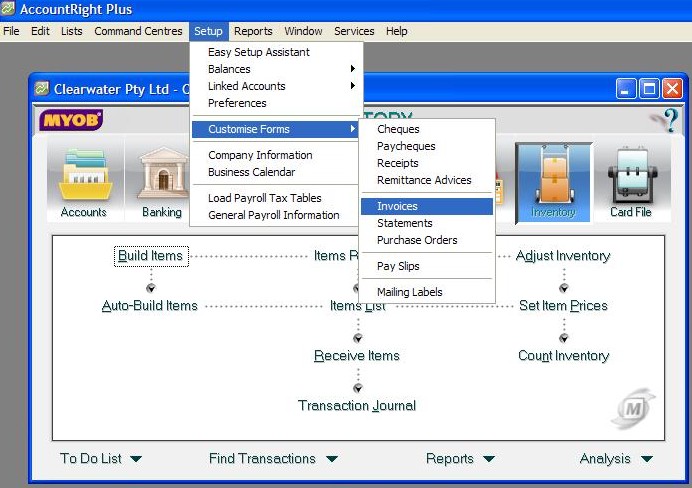
The easiest way to do this is to click on Setup on the Toolbar and then go to Customise Forms in the dropdown box. You will see that MYOB allows you to customise the following:

  • Cheques
  • Pay Cheques
  • Receipts
  • Remittance Advices
  • Invoices
  • Statements
  • Purchase Orders
  • Payslips
  • Mailing Labels

***

Customising Forms in MYOB

Video Reference: 501601

Link for existing students: http://ezylearnonline.com.au/training/mod/resource/view.php?id=382

Receive EzyLearn news, new training materials and updates as they occur by subscribing to the blog:www.ezylearn.com.au/wordpress

For information about our Online MYOB Training Course and new Lifetime Membership for all students, please visit: http://ezylearnonline.com.au/courses/myob-training/

Please feel free to send your comments about this video to: sales@ezylearn.com.au
 

Posted on

MYOB Online Course Videos — Linked Accounts for Sales

Receiving-cheques-MYOB-cheap-online-training-courses-packageIf you receive many cheques each week from customers but only bank once a week then use the Undeposited Funds account in MYOB for this.

You can then print your own Bank Deposit Slips. This also saves you the cost of purchasing a Bank Deposit Book.

If you are a small business and do not receive many cheques, enter the cheques that you do receive into the Company Account. Remember to keep a note in MYOB regarding this transaction.


***

Link for existing students: http://myobcourse.com/elearning/mod/resource/view.php?id=358

Receive EzyLearn news, new training materials and updates as they occur by subscribing to the blog: www.ezylearn.com.au/wordpress

For information about our Online MYOB Training Course and new Lifetime Membership for all students, please visit: www.ezylearnonline.com.au/courses/myob-training/

Please feel free to send your comments about this video to: sales@ezylearn.com.au
***


Posted on

MYOB Online Course Videos — Setting up Selling and Payments

Here’s another time saving tip: Did you know that if the majority of your income is derived by one type of service, you can set up your Sales Account so that it automatically defaults to the correct account code?

You can also add any Credit Limit, should you extend credit to clients/customers. By entering this limit it becomes easy to track when your client/customer reaches their limit.

When setting up Selling and Payments, it’s always best to leave the Payment Method blank as these days payment methods can come in many forms.

Set up your Payment Terms to suit company policy. Should you give discounts for early payment or an extra fee for late payments, make sure this is entered so it is an automatic entry on all your invoices and/or receipts.

***

Setting up Selling and Payments in MYOB

Video Reference: 501202

Link for existing students: http://myobcourse.com/elearning/mod/resource/view.php?id=357

Receive EzyLearn news, new training materials and updates as they occur by subscribing to the blog: www.ezylearn.com.au/wordpress

For information about our Online MYOB Training Course and new Lifetime Membership for all students, please visit: www.ezylearnonline.com.au/courses/myob-training/

Please feel free to send your comments about this video to: sales@ezylearn.com.au

***

Posted on

MYOB Online Course Videos — Creating Customer Cards

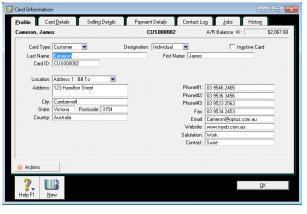
Creating customer cards in MYOB is easy! To enter a new customer, simply click on ‘New’; this will bring up a new window.

It’s also simple to edit customers here. Say you want to change postal or contact details, simply click on ‘Customer’ and hit ‘Edit’.

You will note that MYOB gives you a choice in the designation section to enter a company or an individual. All customer entries are stored alphabetically so make sure if you are entering an individual you use their last name first.

You use the tab key as a shortcut to go through all the fields.

501204 - creating customer cards in cheap online myob training coursesA handy hint: When a customer has a longer address, such as a unit number or a Suite number, hold the Control Key and press ‘Enter’ for a second line.

Also, if you have tabbed past a field you need, simply hold the Shift Key and hit the ‘Tab’ key to go up to the field above.

Video Reference: 501204

Receive EzyLearn news, new training materials and updates as they occur by subscribing to the blog: www.ezylearn.com.au/wordpress

For information about our Online MYOB Training Course and new Lifetime Membership for all students, please visit: www.ezylearnonline.com.au/courses/myob-training/

Please feel free to send your comments about this video to: sales@ezylearn.com.au

***


Posted on

MYOB Online Course Videos — Opening Your New File

To launch MYOB, click on the MYOB icon on your desktop, you will see the welcome screen, click on open your company file.

IMPORTANT: When MYOB was installed on your computer, a MYOB folder was created on ‘C’ drive.

Go to ‘my computer’ click on ‘C’ drive – you will note that only MYOB files are being searched for – click on appropriate MYOB, select company file and select open.

You will now see the sign on screen which defers to administrator, if you have a password you will need to enter this, click ‘OK’ (if there is no password then you only need to click OK).

There is now a screen which prompts you to activate the company file – all companies must be activated with MYOB. Click continue and you will be on the MYOB Command Centre.

***

Video Reference: 501503

Link for existing students:

http://ezylearnonline.com.au/training/mod/resource/view.php?id=380

Receive EzyLearn news, new training materials and updates as they occur by subscribing to the blog: www.ezylearn.com.au/wordpress

For information about our Online MYOB Training Course and new Lifetime Membership for all students, please visit: www.ezylearnonline.com.au/courses/myob-training/

Please feel free to send your comments about this video to: sales@ezylearn.com.au

Posted on

MYOB Online Course Videos – The Toolbar for Customising your Invoice Forms

Do you fully utilise your Tool Bar in MYOB?

If not then you might not be aware that there is a Tool Bar for customising invoices. This enables you to click on the icons to set up and add logos, addresses, phone numbers and web pages — it’s so easy! Updated logos can be entered with ease when you use the Shortcut icons. Just click on the picture icon, select the logo from your file and enter it on the invoice. (Don’t forget to click on Preview so you can see whether your logo is positioned where you intended it to be. If not, simply move the logo to another position.)

Has your company opened new office premises? Would you like to have the addresses of the new offices included in your invoices but have your particular office most prominent? No problem; click on the icon for creating a Text Box. From here, move to where you would like on the invoice and type in the new addresses, making your office the most prominent. Then Preview the invoice to see that it’s set out the way you want. If you make a mistake, never fear — the Undo button works wonders for this.

***

Receive EzyLearn news, new training materials and updates as they occur by subscribing to the blog: www.ezylearn.com.au/wordpress

For information about our Online MYOB Training Course and new Lifetime Membership for all students, please visit: www.ezylearnonline.com.au/courses/myob-training/

Please feel free to send your comments about this video to: sales@ezylearn.com.au