Posted on

MYOB Online Course Videos — MYOB Sales — Converting Order to Invoice

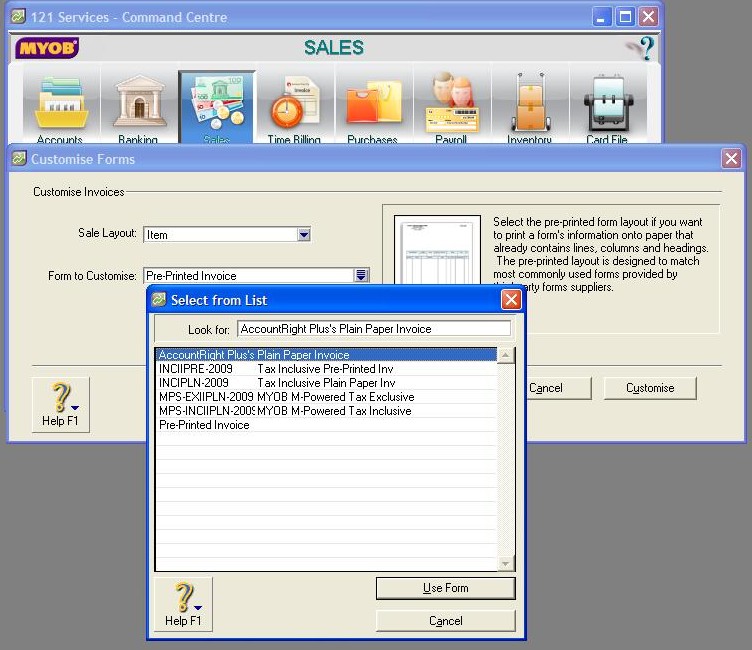
To change an existing order into an invoice, click Sales from the Command Centre, then click Enter Sales.

You’ll now see a blank screen where you enter Invoices, Quotes and Orders. Type in the name of your customer then click Tab and  the list of quotes and orders for that customer will appear on your screen. Select the order required and click Use Sale.

The order is now on the screen. Click the Invoice icon at the bottom of the screen and you’ll see that the order has been converted into an invoice. Note that the invoice number and order number are the same.

You can now send, print or record as normal.

If your Customer has paid the invoice, MYOB lets you fill in this option by clicking on the Payment Icon; it will then take you to the Payment Screen.

HINT: Click the Escape key to take you out of the payment screen if you have clicked on payment by mistake.

502112 Converting Order to Invoice in MYOB

Video Reference: 502112

Link for existing students: http://ezylearnonline.com.au/training/mod/resource/view.php?id=406

Receive EzyLearn news, new training materials and updates as they occur by subscribing to the blog: www.ezylearn.com.au/wordpress

For information about our Online MYOB Training Course and new Lifetime Membership for all students, please visit: http://ezylearnonline.com.au/courses/myob-training/

Please feel free to send your comments about this video to: sales@ezylearn.com.au


Posted on

MYOB Online Course Videos — Moving and Resizing Fields

To resize a text box, select the box for resizing. You will note that the text is centred in the text box.

To resize, select the centre black box and, making sure that you see a cross, hold the mouse down and drag to the required size. The text will still continue to be centred.

If you see a hand then all that will happen is you will move the text box; not resize it.

Also, ensure that if you click anywhere on the invoice, you have not accidentally highlighted another text box or column.


Moving and Resizing Fields in MYOB

Video Reference: 501606

Link for existing students: http://ezylearnonline.com.au/training/mod/resource/view.php?id=387

Receive EzyLearn news, new training materials and updates as they occur by subscribing to the blog: www.ezylearn.com.au/wordpress

For information about our Online MYOB Training Course and new Lifetime Membership for all students, please visit: http://ezylearnonline.com.au/courses/myob-training/

Please feel free to send your comments about this video to: sales@ezylearn.com.au


Posted on

MYOB Online Course Videos — Tax ‘Inclusive’ and Tax ‘Extended’ Invoice Layouts

In ‘Customise Forms’, MYOB gives you several options.

First, you can select the option INCIPLN which is Tax Inclusive Plain Paper Invoice. Then click on Customise.

You will see with this option that under the Heading ‘Price’, it has Inc Amount. Under the Heading ‘Extended’ it also has Inc Amount. This shows you that the amounts entered will be GST Inclusive. (Note: The Heading ‘Extended’ gives you the total amount, whereas the amount under Heading ‘Price’ gives you the unit amount.)

The difference between Ex Amount and Inc Amount can be explained as follows:

Ex Amount GST (10%) Inc Amount

Item Cost         $55.00                         $5.50               $60.50

If you select the Plain Paper invoice, you’ll note that under Headings ‘Price’ and ‘Extended’ it states Ex Amount. This means that it is GST Exclusive.

Most customers / clients prefer to see the full amount they will be paying. You will have to decide which type of Invoice your company prefers.

Tax Inclusive and Tax Extended Invoice Layouts


Video Reference: 501603

Link for existing students: http://ezylearnonline.com.au/training/mod/resource/view.php?id=384

Receive EzyLearn news, new training materials and updates as they occur by subscribing to the blog: www.ezylearn.com.au/wordpress

For information about our Online MYOB Training Course and new Lifetime Membership for all students, please visit: www.ezylearnonline.com.au/courses/myob-training/

Please feel free to send your comments about this video to: sales@ezylearn.com.au


Posted on

MYOB Online Course Videos — Invoice Form Layouts

To Customise Forms, go to Setup on the Toolbar, then Customise Forms and select Invoice.

The Customise Forms dialog box will open up.

You will note that in the Sales Layout section that ‘Item’ is already selected. This was done previously when setting up the company. You can change this here if you had selected incorrect type of invoice.

If you click on Form to Customise, you’ll see that MYOB gives you a number of options.

Should your company already have blank invoices printed, you would select Pre-Printed Invoices. MYOB will then only enter the data and would not enter any line formatting.

Should your company prefer for the invoices to be printed via a MYOB customised form you would select Plain Paper Invoice. With this option selected MYOB will include all lines, columns and headers as well as the data.

Video Reference: 501602

Link for existing students: http://ezylearnonline.com.au/training/mod/resource/view.php?id=383

Receive EzyLearn news, new training materials and updates as they occur by subscribing to the blog: www.ezylearn.com.au/wordpress

For information about our Online MYOB Training Course and new Lifetime Membership for all students, please visit: http://ezylearnonline.com.au/courses/myob-training/

Please feel free to send your comments about this video to: sales@ezylearn.com.au


Posted on

MYOB Online Course Videos — Restoring a Backed Up File

Restoring a backed up file is easy! Just go to File, then click Restore in the dropdown box. MYOB will prompt you to back up the company file you are in; just click No.

Select the file you want to restore. Insert the disc or USB (whichever way you backed up your file), select File, then Open.

MYOB will then ask where you want to save the file. Select ‘C’ drive, then MYOB Plus 19 folder.

So that you know this is a restored file, save it as company name (followed by ‘restored’) and then today’s date and save.

MYOB will then advise the name and place where you have requested the restored file to be saved to.

MYOB will then extract the restored backup.

***

Video Reference: 501504

Link for existing students: http://ezylearnonline.com.au/training/mod/resource/view.php?id=381

Receive EzyLearn news, new training materials and updates as they occur by subscribing to the blog: www.ezylearn.com.au/wordpress

For information about our Online MYOB Training Course and new Lifetime Membership for all students, please visit: http://ezylearnonline.com.au/courses/myob-training/

Please feel free to send your comments about this video to: sales@ezylearn.com.au


Posted on

MYOB Online Course Videos — Creating Items

There are two ways to get to the inventory options. The first is by clicking Inventory on the main Command Centre. The second is by clicking on Command Centre on the top tab and then going to Inventory. The second way may be the one you would use if you are using a more basic MYOB program.

When in Inventory, click on Item List and then click on the New icon. You can now type in what you will name the item. Tab will give you the other options – buy, sell or inventory item.

Here you can add the details for which account to track the item.

To enter the cost of the item (if it is for a sale item), click on the selling details and the cost-per-unit can be entered. Here you can also make sure that GST is included in the price.

Doing this saves time as all details, such as the cost per item and whether GST has been added, are all included now when doing a sales invoice.

Creating Items in MYOB

***

Video Reference: 501404

Link for existing students: http://ezylearnonline.com.au/training/mod/resource/view.php?id=376

Receive EzyLearn news, new training materials and updates as they occur by subscribing to the blog: www.ezylearn.com.au/wordpress

For information about our Online MYOB Training Course and new Lifetime Membership for all students, please visit: www.ezylearnonline.com.au/courses/myob-training/

Please feel free to send your comments about this video to: sales@ezylearn.com.au

***


Posted on

MYOB Online Course Videos — Entering Opening Balances

You have now finalised setting up your company using the Easy Setup Assistant. However, you”ve just realised that you”ve forgotten a couple of financial documents or you”ve just received some extra ones that need to be added. Therefore you need to change your balances. What do you do?

All you need to do is this: On Setup on the Toolbar, select balances on the dropdown box, then select which of the four options you require.

If you need to add for accounts, click on the link and you will be taken to your Accounts List. Note that you are given accounts for Assets, Liability and Equity.

To change amounts, it”s just a matter of clicking on the numerical field and typing in the amount. If there are a number of balances which require changing, use casino online the tab key as this will take you through the fields more quickly.

Entering Opening Balances in MYOB

***

Video Reference: 501307

Link for existing students: http://myobcourse.com/elearning/mod/resource/view.php?id=369

Receive EzyLearn news, new training materials and updates as they occur by subscribing to the blog: www.ezylearn.com.au/wordpress

For information about our Online MYOB Training Course and new Lifetime Membership for all students, please visit: www.ezylearnonline.com.au/courses/myob-training/

Please feel free to send your comments about this video to: sales@ezylearn.com.au

***


Posted on

Who Owes Me Money?

I work with several different clients each week and the time I spend on each project varies. Some clients are great payers while others need me to wait until the end of the month to fit in with their accounting system. How can I keep track of my trade debtors easily?

I realised that I can start to use MYOB AccountRight today. I can set up a simple chart of accounts, customise an invoice form, enter client details and start invoicing with professional-looking invoices. Now when a client asks how much they own me, I click a few buttons and they have the exact answer.

MYOB is a quick and easy way –  not only look professional but to be professional. Even better, you don’t need to know anything about accounting.

– Frankie Varley


Frankie Varley MYOB Tips