Posted on

MYOB Online Course Videos — The Sales Screen

To see where you would enter a sale using existing information, click on the ‘Sale’ Icon and then click on ‘Enter Sales’.

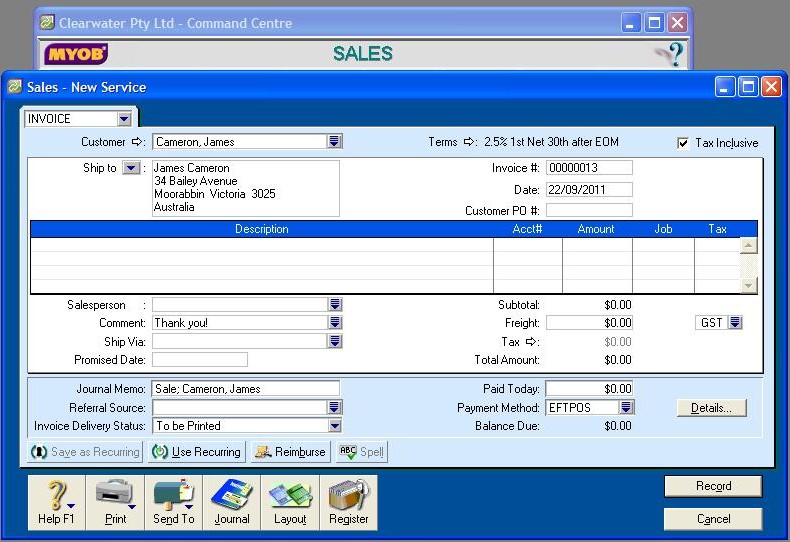
The Invoice window will now be on your screen. The cursor automatically defaults to the Customer Fields.

[Hint: Use your ‘TAB’ key to go to the different fields on the invoice.]

Click on the drop down box next to Customer; all the customers that have been entered will be shown. Select the correct customer and click on the Use Customer button at the bottom of the customer screen.

Notice now that the shipping details, terms and tax have automatically been entered.

In the Invoice Number field, MYOB defaults to a numbered invoice. This can be changed to reflect your invoice keeping.

If your customer has given you a Purchase Order Number, MYOB has a field in which you can enter that number so that your customer can online slots keep track on their own accounts.

Note that there is a field where you can enter a salesperson – this is handy, particularly if you have staff members who are paid on a commission basis.

The Comments field defaults to ‘Thank You’ but MYOB does give you other options – or you can add your own.

If this is an invoice which was paid on the day, there is a field for both this and the Payment Method.
502102 sales screen in MYOB

Video Reference: 502102

Link for existing students: http://ezylearnonline.com.au/training/mod/resource/view.php?id=395

Receive EzyLearn news, new training materials and updates as they occur by subscribing to the blog: www.ezylearn.com.au/wordpress

For information about our Online MYOB Training Course and new Lifetime Membership for all students, please visit: http://ezylearnonline.com.au/courses/myob-training/

Please feel free to send your comments about this video to: sales@ezylearn.com.au


Posted on

MYOB Online Course Videos — Entering Items in MYOB Sales

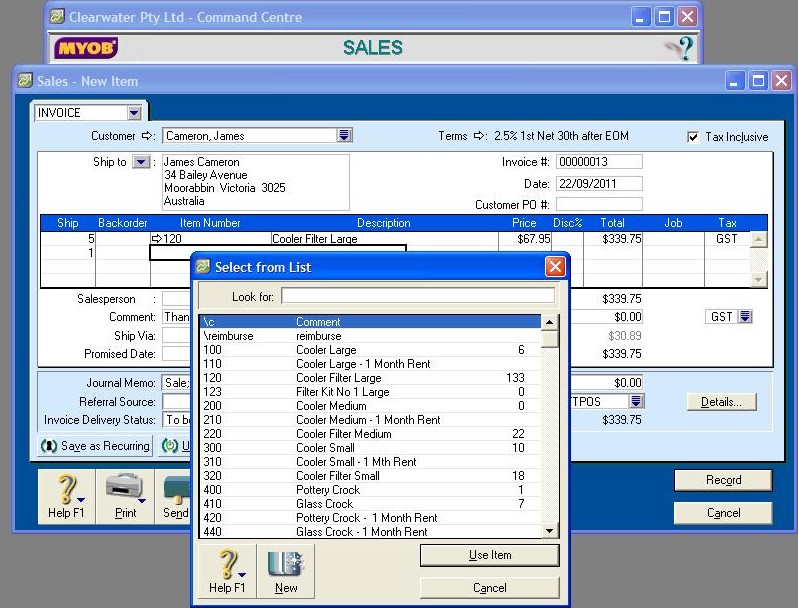
The ‘Item’ invoice layout is on your screen. If you use your Tab Key you will note that MYOB allows you to jump to the next field. This is extremely handy when you have a number of invoices to do because it saves lots of time!

To enter, firstly type in the number of the items sold, tab to Item Number then tab again and you’ll see a List of Items on your screen.

Important: You MUST enter an Item Number when using an Item Layout for your invoices.

Your Items list will have the Item number, description of Item and the Number of Items in stock. Select the Item and click on the button ‘Use this Item’. Tab and the description of that Item is in the Description field; tab again and the price of each Item will be shown. Tab again and the full price will be in the Total field.

If you have more items to enter for this sale, simply click Enter and you will be on the next line of your invoice.

502104 sales enter items in MYOB

Video Reference: 502104

Link for existing students: http://ezylearnonline.com.au/training/mod/resource/view.php?id=398

Receive EzyLearn news, new training materials and updates as they occur by subscribing to the blog: www.ezylearn.com.au/wordpress

For information about our Online MYOB Training Course and new Lifetime Membership for all students, please visit: http://ezylearnonline.com.au/courses/myob-training/

Please feel free to send your comments about this video to: sales@ezylearn.com.au


Posted on

MYOB Online Course Videos — Sales Layout

MYOB allows you to change the look of your invoice even though you may already have entered the type of invoice in Setup.

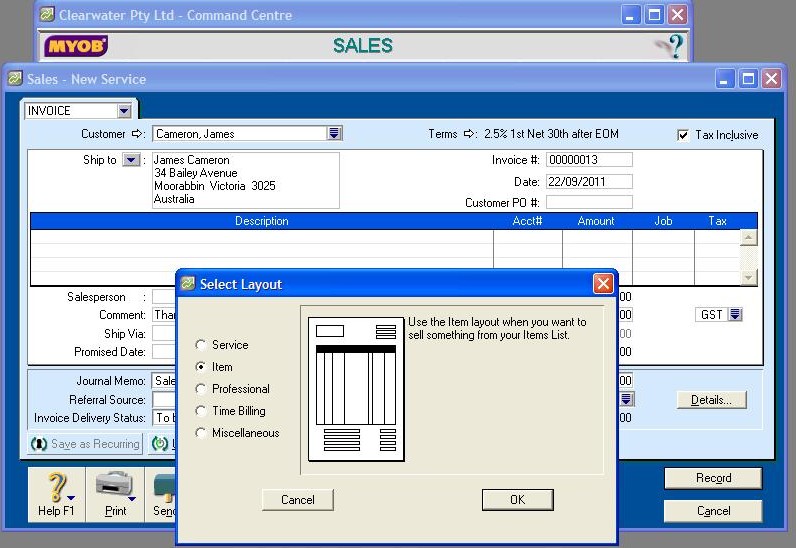
At the bottom of your invoice is a layout icon. Click on the icon and the List of Layouts will now show. When you click on the different layouts, MYOB gives a brief description of each option.

Selecting the ‘Item’ invoice, you will notice that the layout has changed and there are more fields to enter information than was on the ‘Service’ layout.

The description field is where you enter the items sold and you can type anything that is appropriate to that item.

The Account number field gives you the Income Account and this is from the Chart of Accounts.

The Tax field gives you the tax amount, whether it is GST or GST free.

You will notice that there is a ‘Job’ Column; it is here you can add a sale to a Job Number. This is used so that you can keep a track of income and expenses for a particular job.

502103 Sales Layout in MYOB

Video Reference: 502103

Link for existing students: http://ezylearnonline.com.au/training/mod/resource/view.php?id=397

Receive EzyLearn news, new training materials and updates as they occur by subscribing to the blog: www.ezylearn.com.au/wordpress

For information about our Online MYOB Training Course and new Lifetime Membership for all students, please visit: www.ezylearnonline.com.au/courses/myob-training/

Please feel free to send your comments about this video to: sales@ezylearn.com.au
***


Posted on

Inventory Opening Balances in MYOB

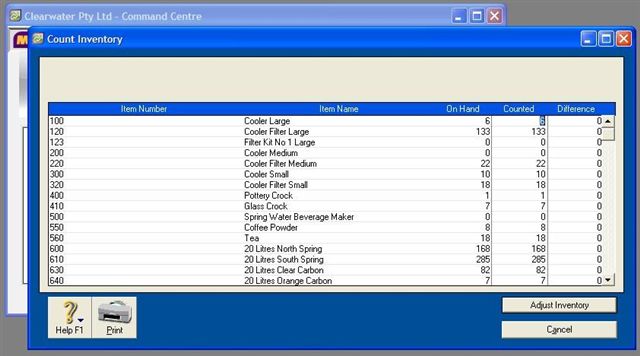
To enter Inventory Balances, click on the inventory Icon, then click on Count Inventory. As this will be the first time, you probably won’t have any items listed.

You can just enter a number in the Counted column and then click Adjust Inventory at the bottom of the page.

The items can be listed later.

Inventory Opening Balances in MYOB

***

Video Reference: 501406

Link for existing students: http://ezylearnonline.com.au/training/mod/resource/view.php?id=372

Receive EzyLearn news, new training materials and updates as they occur by subscribing to the blog: www.ezylearn.com.au/wordpress

For information about our Online MYOB Training Course and new Lifetime Membership for all students, please visit: www.ezylearnonline.com.au/courses/myob-training/

Please feel free to send your comments about this video to: sales@ezylearn.com.au
***


Posted on

Extra Item Information in MYOB

You can enter items that you buy AND sell in MYOB. To do this, click on the white arrow beside the item number. You will then have the properties on the screen. Click on ‘Buy this item’ and select the tracking account. If you do not have an account, click on the drop down arrow and the account list will come up. Remember the account number you wish to add and click new, enter the account number and name and then attach to the item. It is as simple as that! Click on the Buying tab and complete the details with regards to GST and amount.

If you click on ‘inventory this item’ MYOB will keep a record of the amount of that item. If you do not have any of those items MYOB will not allow a sale, you will need to enter a purchase of that item.

***

Video Reference: 501405

Link for existing students: http://ezylearnonline.com.au/training/mod/resource/view.php?id=377

Receive EzyLearn news, new training materials and updates as they occur by subscribing to the blog: www.ezylearn.com.au/wordpress

For information about our Online MYOB Training Course and new Lifetime Membership for all students, please visit: www.ezylearnonline.com.au/courses/myob-training/

Please feel free to send your comments about this video to: sales@ezylearn.com.au
***


Posted on

MYOB Online Course Videos — Extra Item Information

You can enter when buying or selling items. To enter items that you buy, click on the white arrow beside the item number; you will then have the properties on the screen. Click on ‘buy this item’ and select the tracking account. If you do not have an account, click on the dropdown arrow and the account list will come up. Remember the account number you wish to add and click New. Enter the account number and name and then attach it to the item. It’s as simple as that! Then simply click on the Buying tab and complete the details with regards to GST and amount.

If you click on ‘inventory this item’, MYOB will keep a record of the amount of that item. If you do not have any of those items, MYOB will not allow a sale – you will need to enter a purchase of that item.

***

Video Reference: 501405

Link for existing students: http://ezylearnonline.com.au/training/mod/resource/view.php?id=377

Receive EzyLearn news, new training materials and updates as they occur by subscribing to the blog: www.ezylearn.com.au/wordpress

For information about our Online MYOB Training Course and new Lifetime Membership for all students, please visit: www.ezylearnonline.com.au/courses/myob-training/

Please feel free to send your comments about this video to: sales@ezylearn.com.au


Posted on

MYOB Online Course Videos — Creating Items

There are two ways to get to the inventory options. The first is by clicking Inventory on the main Command Centre. The second is by clicking on Command Centre on the top tab and then going to Inventory. The second way would probably be the one you would use if using a more basic MYOB program.

When in Inventory, click on Item List and then click on the new icon. You can type in what you will name the item. Tab will give you the other options – buy, sell or inventory item.

Here you can add the details for which account to track the item.

To enter the cost of the item (if it is for a sale item), click on the selling details and the cost per unit can be entered. Here you can also make sure that GST is included in the price.

Doing this saves time as all details, such as cost per item and whether GST has been added, will be present when doing a sales invoice.

***

Video Reference: 501404

Link for existing students: http://ezylearnonline.com.au/training/mod/resource/view.php?id=376

Receive EzyLearn news, new training materials and updates as they occur by subscribing to the blog: www.ezylearn.com.au/wordpress

For information about our Online MYOB Training Course and new Lifetime Membership for all students, please visit: www.ezylearnonline.com.au/courses/myob-training/

Please feel free to send your comments about this video to: sales@ezylearn.com.au


Posted on

MYOB Online Course Videos — Customising the Toolbar

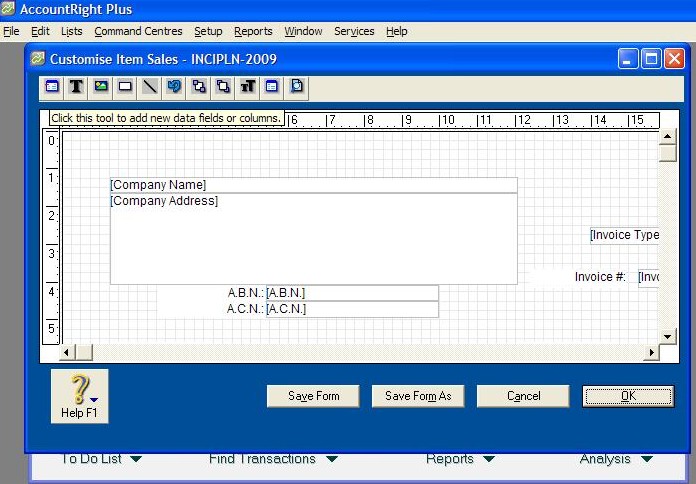
Do you fully utilise your Toolbar in MYOB? For instance, let’s take the Toolbar for invoices. When using Icons, the setting up and adding of logos, addresses, phone numbers and web pages is as simple as the click of a mouse!

You can enter new or updated logos with ease with the Shortcut Icons. Just click on the picture icon, select the logo from your file and enter it on the invoice. Don’t forget to click Preview to check the logo is in the position you want. If not, simply move it to the right one.

Perhaps your company has opened new offices and you want to feature all the addresses for state offices, but have your particular office prominent? No problem! Just click on the icon for creating a text box, move to where you want it to go on the invoice, type in the new addresses, then click Preview to see that everything’s set out correctly.

And remember: Any time you make a mistake, the Undo button works wonders!

Customising the Toolbar in MYOB


CLICK HERE to watch the MYOB Course Training Video


Video Reference: 501701

Link for existing students: http://ezylearnonline.com.au/training/mod/resource/view.php?id=388

Receive EzyLearn news, new training materials and updates as they occur by subscribing to the blog: www.ezylearn.com.au/wordpress

For information about our Online MYOB Training Course and new Lifetime Membership for all students, please visit: http://ezylearnonline.com.au/courses/myob-training/

Please feel free to send your comments about this video to: sales@ezylearn.com.au